Showing posts with label Craft Projects. Show all posts

Tuesday, May 15, 2012

DIY Felt Rosebud Heart Wreath

Pin It


THIS POST IS IN THE WORKS! PLEASE CHECK BACK IN A DAY OR SO. THANKS FOR LOOKING :)

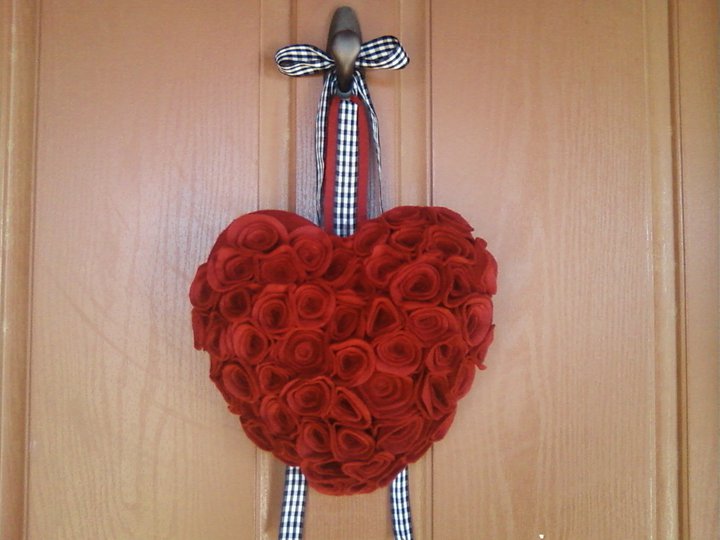
A favorite neighbor of mine from childhood (my friend's mom actually) was recently diagnosed with cancer.  She was undergoing chemotherapy and was having a pretty rough time.  I decided I wanted to send her something to let her know I loved her and help raise her spirits.  I didn't want to send flowers because I wanted something different.  Something that would last. It was close to Valentine's Day so I decided to make her a wreath made from felt flowers.

I bought 1 yard of deep red felt (the kind on the bolt - sold at most fabric stores).  I needed to come up with a wreath form but didn't want to pay a lot (if anything) for it.  I was going initially going to draw one freehand on a scrap of plywood and use my jigsaw to cut it out.  I found this heart shaped plate at the 99 Cents Only store while shopping for something else and figured I could very easily make it work.  They usually carry them around Valentine's Day. It's just a plain, heart shaped melamine plate. If you don't have a 99 Cents Only store near you, they always have them at Target around Valentine's Day too.


The plate has a very slight bowl shape to it when its laying flat on its back.  I pulled some stuffing out of an old pillow and laid it into the bowl.  I then hot glued a piece of felt around the entire front wrapping completely around the back and hot glued it down.  I cut another piece of hot glue in the shape of the plate and glued it to the bottom of the plate to cover up the edges of the top piece I had pulled around to the back and hot glued in place.

I then made a MILLION felt rosebuds and hot glued them together very closely until the entire top and sides of the wreath were completely covered with roses.  To make a single rose, cut a felt circle 3-4 inches in diameter.  Don't worry about trying to get a perfect circle.  Its actually better to have it a bit more organicly shaped anyway (it will give more shape to your outer petals).

The next part is a little tricky to explain (but easy to do....don't freak out).  I'll try my best to explain (and use lots of cryptic, hard to understand photos for you to try to figure out -  kinda like Ikea assembly instructions). 

To hang, find a ribbon of your choice and hot glue to the back of the plate.

Sunday, May 13, 2012

DIY Pottery Barn Inspired Numbers Painting

Pin It


Okay, so if you've looked thru many of my posts, you can probably tell I have a thing for typography.  When I saw this painting from Pottery Barn, I fell in love. 


Let me clarify, I fell in love with the IDEA of the painting.  I did have a few problems with it though.  Obviously, the price was more than I wanted to pay for a wrap around laser print.  It wasn't even a real canvas, just printed to look like one which meant it wouldn't be durable and wouldn't look very real anyway.  The other thing that really bugged me were the random numbers on it.  I decided I'd do my own with numbers significant to me and my family.  I had a giant blank wall in my living room. I knew I needed something on a large scale to look good.  I found a large 36 x 48 canvas at a funny little thrift store down the road for $7.  I knew it would be the perfect size for a large wall in my living room.  I jumped on it.  The great thing about this project is that you could really recycle any canvas you wanted to.

I love hitting thrift stores and picking out the VERY ugliest paintings they have because you'll be covering the image up with your own and you can usually get the really tacky ones for next to nothing.  Last week I found a large canvas at Goodwill that I should have bought.  I really really should have.  I've been wishing I had ever since.  I guess the best way to explain it would have been to show you this:
Now that you have some idea of what I'm talking about, imagine blue and purple make up and a bigger perm all in a graphic-y arts painting kind of form.  If I remember correctly, there were even little rhinestones on her leotard. It really was fantastic. I'm kicking myself for not buying it.  It was almost to amazing to cover up with another project though.  In fact, it would probably have ended up being a Christmas gift for my little brother Ryan.  He would have loved it! Bummer.

Saturday, May 12, 2012

Vintage Numbered Boxes

Pin It While walking thru Ikea, I noticed these dovetailed, solid wood boxes in the garden section.  They were really inexpensive and looked well made.  Each of them came with a small, removable metal tray inside too if you wanted to use them as planters or table center pieces. I bought the large square ones (I think they were around $9 each).  They also had smaller squares as well as rectangular ones.  I loved the dovetailing.  I decided to distress and stain them.  I used a hammer, my handy can-opener (handy for beating furniture, not opening cans.....stupid, crappy can-opener) and anything else I could bang on it with that wouldn't break. 

I gave it a quick rub down with an orphaned athletic sock soaked in Minwax Dark Walnu t stain. After it was dry, I used a generic 3" stencil from the hardware store and gave them a quick paint job with some black craft paint sponged on with a cheapo black sponge brush. After the paint dried, I went over the stenciled number with a fine grit sandpaper to age it a bit. The Numer "1" bin is mine to store keys and my wallet and anything else I happen to have in my pockets.  My husband quickly called the "number 2" bucket because in his heart, he is still a twelve year old boy.....

DIY Faux Antique French Stoneware

Pin It

I'm always excited to find new products or techniques I haven't seen or tried before.  One day I was at the craft store and saw a box of pre-made paper mache.  All you had to do was add water.  Hmmmmmmm, interesting.  I knew I definitely needed it and couldn't live another second without it,  I just wasn't sure why.  I remembered LOVING paper mache while in Mrs. Reed's second grade glass.  I loved the way it felt, the way it smelled and maybe I also liked the way it tasted.  I said MAYBE! Don't judge me! Anyhooo, I bought this at Michael's crafts (I think it was around $5 with a 40% off coupon).


It was true, all you had to do was add water.  Oh, and it was just how I remembered it.  Squishy and cold and slimy and smelled exactly the way I thought it would. Not sure how this brand tastes.  Maybe someday I'll let you know. Not today. 

The label said it would "stick to any surface." That got me thinking about what I had laying around my house to experiment on. I rummaged through my kitchen and found a couple of glass containers that were missing their lids and were marked to go to Goodwill. Here is what I started with (except without the lid, of course):


When I mixed the paper mache dough, I didn't really pay attention to the directions.  I added enough water to make it a nice soft play dough or pottery clay consistency.  It was maybe a little bit stickier than play dough but not much. I pressed it on the glass and kept adding and adding and smoothing with my fingers.  I wanted it to look very hand made and rustic.  I didn't want it to be perfectly smooth.  I got it as smooth as I could and placed it on a baking cooling rack overnight to air-dry.

This is what it looked like after it had dried before sanding and painting (a smaller one I also made - forgot to take a midpoint photo for this one. Oopsie).
I decided to take pics before lining the inside of the pot so it would be easier to see.

The next day after it was good and dry, I went over it with a piece of medium then fine sandpaper until I was happy with how smooth it was.  To make it appear authentic and worn, I wanted it to be pretty smooth (but still wavy if that makes sense). 

I painted the entire piece in a creamy white acrylic craft paint (any cream paint would do fine).  After the cream paint was dry, I stenciled a number "5" on one side (to symbolize the number in my family) in a dark gray. I decided to use a dark gray so it looked aged.  I thought black would be to dark.  I then waited a day or two until all of the paint was good and dried and used painters tape to block off one thin line around the jar. I sponged it on with a black disposable sponge brush really lightly in a country french blue.


I gave it another sanding (this time with my eyes closed to make the worn areas more random and natural). Once it was "worn enough" I rubbed it down with one coat of antique glaze.  If you aren't familiar with this product, it's AWESOME.  You can buy it by the quart or even by the gallon at the big box home improvement centers or in the small craft paint size bottles at craft stores.  The stuff lasts a loooong time.  You rub it on with a soft cloth and then rub it right back off.  The little cracks, crevices and any imperfections or dimples retain some of the glaze.  It adds more dimension and authenticity to vintage or antique finishes.  It's one of my favorite products. 

I've decided I'd like to play with (not eat) this paper mache stuff a bit more.  It really does seem to stick to anything.  Looking at this cheapo glass canister, you would never guess its paper mache.  It looks, feels and even sounds like stoneware when you knock on it. I think I'll try covering some cheap bowls or maybe make a utensil holder for next to the stove.  So many things you could do with this amazing paper mache!! 

After I finished the glass container, I had a little bit left.  I used the same technique on a plain terra cotta pot. Once again, it stuck just fine and is completely believable. One of the nice things about this paper mache is it will last several days if you store it in an airtight container in the refrigerator.